Mixed-media paper crafter; stamper, freelance craft tutor, designer of PaperArtsy JOFY stamps

26 August 2011

Happy Birthday!!...

... to my Hubby - who turned 40 yesterday - here's the card I made him - quite simple.  I love this card structure - deceptively simple...
So its fairly simple but it took quite a few bits of equipment - the big numbers are cut with the Slice, the panel they sit on is a Nestabilities die, the big 'happy' is a new stamp by Imagine That (love those stamps - they have a great 'christmas' set of the same design), 'happy birthday' is a Hero Arts stamp... I think that's enough for one card!  Oh no, hold on, 'happy' was stamped in silver ink & I brushed Perfect Pearls over the top. yep thats all.
I love/chose the colours for the card because my Hubby has a fondness for shirts that have a blue check pattern! Seriously - I think he might have cornered the market in them! lol

Take care - enjoy the long weekend.
Share:

23 August 2011

A this'n'that catch up.... Part 2

Here's another random selection of stuff that I meant to show you before now:

Ranger have brought out some more Distress Stains!! Squeeeeel! Love this product.
Thank you for the lovely messages I had about my article in this month's Craft Stamper - glad I inspired you.  I bought a few more of the Stains and played with the bleach on these too:
No great surprises in the remaining colour once bleached (eg walnut stain that has a great purple when bleached) but I do like the pale yellow thats left in the black soot - nice.
I bought Milled Lavender after I'd made these samples - it wasn't one of my favourite Distress Colours (not sure I even have it as an ink pad) (a bit of a 'non-colour) but the Stain is a really lovely soft pretty colour.  I'm converted.
Picket Fence!!! ooh thats a good one - its more opaque than the other stains - great for a white wash look over a surface.. very versatile.
------------------------------
October ArtsyCrafts!!!
Oops  - can't believe I haven't blogged about this before now!! - well I might have mentioned that it was running but what I haven't mentioned is that its going to be another exciting event with another guest teacher!!!
In addition to the usual top classes by Leandra & Lin, Lynne Perella will teach 3 days of classes - a different one each day.
How fabulous is that!
Aaaaaand its very exciting for me because I'm not going to be working at the event* - I'm going to be taking 2 of the classes!!!!!!!  Beyond excited.
(* don't get me wrong I love working at these events)

------------------------------

aaaand another exciting event - so much arty learning will be going into my head in October I may implode (but don't worry if I do it will be sparkly and there may be buttons..lol) - I was lucky to get a place on the Dina Wakley classes at LB Crafts!!!!!!!!!!!!!
Again, beyond excited! lol  I love Dina's artsy, splashy, colour rich, sprayiness (yes, I know that's not a word but I'm excited so forgive me! lol)
So many new exciting things to be learnt in October ( I love learning new things) I may have to lay in a darkened room for the whole of November! lol
-----------------------------------

In my workroom there are lots of boxes with supplies in them, & it's sort of organised (& getting better, its an ongoing process) - I have several Moppe boxes (from Ikea - love these but apparently they don't make them anymore! The shock!) but these boxes aren't very interesting to look at - so I pulled out some of my current favourite scrapbook papers and covered the drawers in those!

I like looking at scrapbook papers!
I like storage.
Its a win win situation. I deliberately kept them simple and embellishment free so that if I get 'bored' of these papers I can easily change them.
Take care
Share:

22 August 2011

So many rosettes, so little time....


Love how this tag turned out - I used Tim Holtz stamps, Nestabililies dies, and the 'cafe' set of Perfect Pearls powders - the Cappucino colour is LUSH- a deep brown.

Last year I made a group of cards (of which these are some - I'd show you more but I can't find the photo's on the pc, grrrr):
and as usual punched out extra pieces which I've now used on these:
(I don't think they're nearly girlie enough - really should try harder.. lol)
(maybe I could make them a bit goth by using Basic Grey's Scarlet's Letter paper - all red black and grey... - embrace my inner goth!! lol)(cut the wings to look sharper and they'll start to look like bats instead of butterflies.. mwahahhaaaa (that's my evil laugh in case you were wondering!)
(no butterflies were harmed in the making of these tags & embellishments)

Take care
Share:

20 August 2011

I've got spray paints & cartidge paper and I'm not afraid to use them.. Part 1

.. & not afraid to make a mess either!  Embracing the 'throw paint at it' approach. 

I mentioned before that I gave up my studio space and everything there had to come here which meant a big sort out was needed.  I have been sorting out, throwing out and its been a really worthwhile experience - I've rediscovered all kinds of things -
lots of things to alter
lots of babywipes
and lots and lots of card blanks!
but more importantly lots of inspiration!!

Its a win win scenario - more space, more inspiration!

So lots of masks were rediscovered (while putting away the ones I already had)(putting things away - how novel lol) - I was distracted from tidying up to quickly cover a page in my sketchbook:
I really like how the scrap paper looks when you move it away from the project - love that big clean space with the colour around it.
Then one thing lead to another:  I left the sheet on the desk and used it while playing with more stencils and masks... (I've been looking at the work of Roben-Marie Smith of PaperBag Studios, Christy Tomlinson, Dyan Reaveley (Art from the Heart), and Dina Wakely and how they use colour and layers in their work. I don't want my work to be as colour heavy as theirs but I enjoy the free-ness (is that even a word?!) of what they do.)
This was definitely a 'throw-something-at-it-and-see-what-happens' page - just playing with the masks - positive and negative versions of...
added a bit of detailing around the edges - this silver pen is FAB - a Faber Castell Indian Ink pen (Christy Tomlinson got me onto those)
 .. bit of 'journaling' - saying: I made this, its mine and I 'own' it (ie it came from me and I should stand by it...)
The sheet is quite big (a2) and so I decided it was going to be more useful to me cut down to postcard size than an A2 sheet! So now I have yet more postcards waiting for.. erm.. something.
For the curious ones of you out there- this is the cartidge paper I'm using (rediscovered in the move - yay!), Windsor & Newton.  Its a really nice weight to work on - doesn't get soggy too quickly...
(smaller pads are available lol)
Share:

19 August 2011

A Rosette tutorial...

There areother tutorials out there on the www (Tim Holtz has one on his site - bit tricky to find but maybe that's because I was looking on the ipad (!!) lol) but I had a few questions /comments about the rosettes after my previous post (as they can be tricky little devils, getting them to lay flat etc etc) & I thought I'd just share with you how I do them - other people may do it differently but this is how I make them....
I hope you find it helpful.

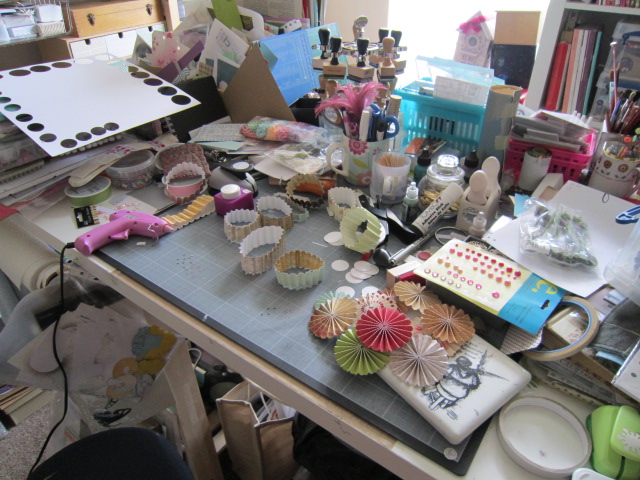
Die cut the rosettes - I've used the original die and the second die with smaller rosettes. (btw when I'm die cutting them I put a bit of sticky tape at either end of the paper to hold in place on the die - stops it wandering/slipping).
I don't use the seals from the dies - I punch out circles seperately (from standard card (Papermania 12x12 packs)) that measure 1" (for the smallest rosette) and 1.5" (for the largest and middle rosette).  These will form the base of the rosettes and give them stability.
Run a line of sticky tape along the wrong side of the rosette - it protects the perforation - prevents them from tearing/splitting.
Fold the rosette & press it firmly between fingers - it helps to keep the folds tight.
Attach slim (5mm) double sided tape to the first panel of the rosette strip, cut to size, remove backing and lay the  last panel of the strip over the top (I prefer to use double sided tape rather than glue - quicker drying time)
Work on a piece of acetate (or a craft non-stick sheet) for the next few stages - working on a slippy surface makes it much easier to push the rosettes down into their final shapes (less resistance).
Use a hot glue gun to attach the base to the rosette.  Run it around as shown - don't put the glue in the centre - you don't want it coming up through the hole in the centre & you might want to add brads through there and they'll be difficult to put through glue.  Also because its liquid it allows time to wiggle the folds into place, get them evened out.
 Position the rosette ring over the base.
Gently push down into position.

Just in case that's as clear as mud here's a little video of the last stage!! 
(I thought it might help to show how I position my fingers on the rosette to get an even spacing of the folds)


I hope you find my little (& first blog) tutorial helpful - if you have any questions please leave them in the comments & I'll get back to you.

Bev asked what background paper is it that I use in photos - its vintage book pages glued to an A2 sheet of card (& Bev, you know how I like vintage book pages! lol)

Happy rosette creating.  I warn you- it can be addictive! 
I'd love to see what you're doing with the rosettes you make- so please leave a link - or follow the blog.
Share:

A this'n'that catch up.... Part 1

... so lots of little bits and pieces going on & being made/created and I've been a bad blogger and only been putting things up on Twitter - cos its so quick! 140 characters and its done... but that makes my blog a bit dull for you lovely peeps out there who aren't on twitter and so stop by this blog (and to be honest with you I'd get more done if I wasn't on twitter lol) - and I'm very grateful to you for popping in.  :o)

Right here's the this'n'that round up:

It was my lovely god-daughters birthday last month so I made her a bunting banner with her name on it..
It started off life like this - a lovely little dress that I bought at the charity shop (reduce, reuse, recycle!), washed and ......

 
....ta-daaa!!  its now very cute bunting for a very cute girlie. Her favourite colour? yep- pink! of course! lol
----------------------

I've started teaching a few classes at Hobbycraft in Chelmsford, only a few, its good fun... different style and products to the other classes I do.
First class was a 'Die-Cutting' class aimed at people considering buying a machine or who had one but wanted to know more.  It was a mix of demo'ing the machines (cuttlebug & bigshot) and teaching.  2 hours of fun. Lovely ladies who went home happy (and inspired) - job done!
Here are a couple of the cards we made:
I'll be doing a couple more classes soon - I'll keep you posted.
---------------------------

I haven't bought stamps for a while but in the past few weeks I seem to have bought loads a few - some I've bought just because they're soooo useful - like these from Papermania - big numbers.. You don't get plain numbers like these very often do you? they're about 3 inches tall - really versatile - just the outline - great for journaling, paper piecing etc. I bought all of them (£2.00 each and buy 2 get 3rd free! kerching! love bargains like that)
so i settled down on the sofa and just doodled inside the numbers - just to see how it felt, how easy it would be to fill the numbers with just black ink. like these a lot - just good simple BIG numbers.  I'm sure there are lots of other filler patterns but they're for another day....

Thats all for now - thanks for stopping by - please 'follow' the blog - its nice to know who pops by & it'd be nice to visit your little corner of www.
xx
Share:

18 August 2011

Attacking the Stash!!...part 2!!

Oh yes - the stash busting continues...
Mainly by creating rosettes using the Tim Holtz dies {love}.  I showed a picture of my desk on Wednesday of the rosettes in progress and people asked what I was doing with them. 
I think making these might get a bit obsessive - 50 and counting - I'm just making the basic rosette (different sizes), putting them in a box and saving them for later... its all in the planning lol (its a sitting in front of the TV sort of job)
Here's batch 1... I started laying them out to look at them and think about what I was going do with them - it became a great way to see how different colour combo's worked together:
Waaaaaaaay back in June 2007 I posted this picture...
..showing how I'd cut a strip of all my sheets of 12x12 so I could flip through and see what I had instead of going through the stash.. seemed like a good idea at the time... but did I do that? ...did I heck! ...no it just hung on the wall looking pretty (at the studio)... so as part of the big studio-clear-out and the reduce, reuse, recycle plan I've use those to make these:
(OK these don't even dent the pile of paper strips but a)the others are going to be used for punching borders & b) you've got to start somewhere! lol)
 
OK, I think thats quite enough rosettes for one day - but I'll just show you a few pics of what I've done with them so far:

Also I colour the mountain folds of the rosettes to disguise the white core of the card/paper thats revealed when folded - love how that looks
(I'm also thinking that rubbing over it with versamark ink and then brushing with Perfect Pearls would look v pretty.. but thats for another time....)
A little compare and contrast for you: left rosette plain... right rosette with colouring of the mountain folds - nice isn't it! (and gives you another colour to match with background papers and images..
There's more on the desk with all the elements laid out but not stuck down - they're for another day.
Share:

17 August 2011

Inspiration can come from anywhere....

... like the metal sheet of the barbeque:
.. or a soaking roasting dish ...there's quite a lot of congealed stuff in there (I'm quite glad this wasn't my dinner)... great pattern & textures though...
Take a look around - inspiration can be found in the strangest places.
Share:

Long time no WOYWW!!.... but I'm here now!

Shocking how long its been since I posted pics of my desk... so here it is in its usual messy glory:
To the untrained eye its looks like there was a direct hit from the creative bomb (& to a certain extent that is the case), but under those rosettes-in-the-making it is newly cleared and organised!! Honest.

I hope you are all well - I'll be around for a cuppa and a snoop later.
Take care - thanks for stopping by!
Share:
Blogger Template Created by pipdig