Mixed-media paper crafter; stamper, freelance craft tutor, designer of PaperArtsy JOFY stamps

21 April 2016

Happy and Sad day......

Today was supposed to be a day of celebration (in England) - which it still is - as the Queen celebrates her 90th birthday...

but then this happened...


I've seen him live several times but it was never going to be enough... .. and now we'll never get the chance again....

He was the soundtrack to my twenties and beyond - he's still on my playlist on my phone... 

Sad times....
Share:

20 April 2016

Gelli® printed...

... pieces that didn't make into my previous Gelli® print related post.. because when you're getting ready for demo's you make lots of bits and pieces (well I do, I assume everyone does lol) .... here are some of those pieces.. all these projects were made using the new mini Gelli® plates

These started off as one long panel (10x30cm) and the background was decorated as one long panel -  but I think its much nicer cut in half and with decorated separately...


Oh I do like an ombre background! (& a 'before and after' shot) This panel had been on my desk for a while - great to use & show how different backgrounds and layers can work together... 

ombre background, gelli printing, stamping, painting and pencil work 

... here is Gelli printing at its most simple - one print (over punchinella) top left hexigon, and then 2 ghost prints... creating a background for a flower & bold word stamp... (oh, and a  border of gold painted/printed bubble wrap!  for a touch of sparkle/shine!)


I hope these samples inspire you to get Gelli printing!!


Thanks for stopping by

x

(Gelli® used with permission. Owned by Gelli Arts® LLC)
Share:

19 April 2016

ACP:2 Pink + G

Lots of lovely options for the letter G but I decided that G is for Gelli print!!...

I really enjoy playing with the Gelli® plate - I recently demo'd it on the PaperArtsy stand at AllyPally - there I used medium sized plates but for this ACP:2 blog post I went large - A4 size - and because my colour for the month is pale pink I picked a few pale Fresco colours and the Gold - Pale pink and Gold is such a lovely combination....
I had a lot of fun with these - this time I haven't created a stand-alone project but several background pages that I can imagine being cut up and used in journals or on cards....

I blended gold through to pink and took a print and a ghost/clean-up print... sometimes the ghost prints have a more interesting texture..
 

...and then I had a lightbulb moment... could I create a woodgrain effect on a Gelli® plate using one of my old interior decorating tools??.....

yes I could!! LOVE these prints!  A pink base layer with gold textured top layer

Here is the main print (centre) and 2 other ghost/clean up prints
(I'm also thinking how great this would be with a pale teal base layer and gold top layer)

Several pulled prints later I decided to create a multi-coloured background - several colours placed randomly onto the plate surface and then blended together with a brayer....


I placed several stencils and masks on to the surface - trying not to overlay each other too much but not leaving any blank spaces either..


and these pages of prettiness are the result... the left hand page is the first print, the second was created after I carefully removed the stencils and pulled a print off the remaining paint on the plate - both are lovely... imho


That is G for the ACP:2 project dealt with - short and sweet - I can't tell you how long its taken me to write this blog post
(well you can see how long - its 9 days overdue!... I kept starting and stopping, & starting again... and stopping... and starting - and oh well.. you get the idea!)

-  -  -  -  -  -  -  -

While we're on the subject of Gelli® prints.....

Here are the samples from AllyPally where I demo'd the Gelli® plate with PaperArtsy's Fresco Finish paints...

A last minute change of plan on the day meant I needed some different equipment and Clarity Stamp had the PERFECT solution! (THANK YOU!)  They have these BIG acrylic plates which are designed to fit the different sizes of Gelli plates...perfect!! (and of course are great for using with oversize stamps!)


These really were a godsend!  When I'm using smaller Gelli® plates I often take the plate to the page rather than the other way around (especially when creating a tiled effect) and so I need something to put the plate on to keep it stable/rigid and these are ideal!   I recommend them and you can find the HERE on the Clarity Stamp website... 

Lots of samples using stencils, bubble wrap.. creating positive and negative prints - so many effects you can create with a Gelli plate but I kept it to one or two layers for these demos...


...and when you're creating prints you need to clean your plate and roller - I do this in a couple of junk journals I've created - great way of creating messy backgrounds...


In preparation for the show I played around with the new small Gelli® plates which come in sets of 3 shapes - hexagon, rectangle, square, circle, oval and triangle.... (my favourite being the hexagon - obviously!!)....
I created a little book with all sorts of different printing options... just a little prompt book really.. a fun thing to create while getting used to using the small plate size.. and useful too - I'm going to keep mine with my gelli plates...

Here are a few of the pages.. I used to paint colours for this book so I could concentrate on the prints and not be distracted by colour.


I'd really recommend making a little book like this filled with samples and notes - do's and don'ts - its not perfect but its very useful, & handy to refer back to and maybe inspire yourself.

If you have a Gelli® plate (which after talking to people at AllyPally, lots of you do but its still in its packet) play with it, make prints - don't stress - its just paint on paper!  If you don't like a print then paint over it (print over it), cut it up, use the bits you do like... A Gelli® plate a fun useful tool.... HAVE FUN! :o)

and to illustrate the above point.... these 3 pieces started off as 1 A4 gelli print that I wasn't sure what to do with so I cut it in half (top panel)... and on one half I gelli printed Bougainvillea circles, along with bubble wrap prints (a bubblewrap print fixes everything! lol) and a flower stencil print (Gold).... it was now looking slightly ...erm.. well ...vibrant (she says diplomatically while thinking 'gaudy') .. but: onwards and upwards...))... I cut it half again to create 2 A6 panels... and finally trimmed and stamped the panel (bottom right) to create a card.....

The card might not be perfect (& its the brightest thing I've created in quite a while!)... but I wanted to show how you can use what you have and change it into something else - you can still see the original green/blue print but now its just a layer.. not the focus...

That's all for now - I'm off to sew all the Gelli prints I've made into a book... or make them into card backgrounds.... 

so many prints.. so little time!!

x


(Gelli® used with permission. Owned by Gelli Arts® LLC)
Share:

13 April 2016

Its all about the boys 'n' bots....

... in my class this coming Saturday (16.04.16) at The Craft Barn..


we'll create a group of cards featuring the latest JOFY stamp releases along with stencils, Fresco Finish paints, Distress Inks & a touch of die cutting.. (& I'm not sure I'll be able to resist adding googly eyes to those cute little 'bots much longer!)

You can find all the details for the class HERE on the The Craft Barn's website.

Hope you can join me!

x
Share:

5 April 2016

Upcoming Classes in April... part 2

Hi

During the weekend of 16-17 April The Artistic Stamper is holding an


This is going to be a fun creative weekend.
I'll be running a workshop on Sunday - creating a gorgeous A4 canvas using paints, stamps, stencils & incorporating a word/name of your choice (as long as that word isn't  supercalifragilisticexpialidocious! lol).


Go HERE for more details - places are running out fast so give the shop a call to book your place.

I hope you can join us.

x
Share:

Upcoming classes in April... part 1

Hi

On the 16 April (saturday) I'll be teaching a class for The Craft Barn - this card making class is all about the boys and the friendly robots.  Below is a taster of what we'll be making.

The class will take place in the Jennings Room in the Lingfield & Dormansland Community Centre (The High Street, Lingfield, RH7 6A) - a great location which many of you will be familiar with if you visited the Craft Barn's Extravaganzas when they took place in Lingfield near the original shop location.

There are a few places left so call the shop on 07958 569279 to book your place.

I hope to see you there!

x
Share:

4 April 2016

Alphabet Colour Project:2 April's colour is...

.. PALE PINK ..
Hi everyone - this month is all about pale pink!! No more bright sunny yellow - not going to lie - that was a hard month & it took slightly more than a month! but I embraced it - & I now own several more pieces of yellow clothing!

but now I'm moving onto PINK (at the pale end of the pink spectrum!)... 


... and the letters G & H

March's Yellow was vibrant & lively, but April's Pale Pink is soothing and makes me give a little 'aaaaaah' and sigh.. very calming.. don't get me wrong I'm not a die-hard fan of pale pink (but it is very welcome after yellow!) - when I reach for pink I go towards the hotter/brighter end of the spectrum - but you'll have too wait 'til later in the year for that (and thats all I'm saying lol)

I've created a board on Pinterest (I hope you enjoy looking at these boards as much as I enjoy creating them) - click HERE to visit - lots of lovely delicate colour schemes and inspirational photos.
Photo

Thanks for stopping by...

x
Share:

3 April 2016

ACP:2 Yellow + F

... yeah, yeah, yeah... this is a late late blog post.. (I thought about moving straight onto April and not completing March's letters but I felt I'd be letting myself (and the project) down if I didn't keep (roughly) to the schedule... (I'm cutting myself some slack here...) but I'm back on it so here we go..

this is yellow's final outing (I've had a word with April and its very accommodating of March's yellow's intrusion into its month (April has a very gentle colour - you'll be introduced to that very soon...)

The second letter for March is F... lots of lovely options for that - and I went for 'feathers' - it was a close call between that & Fabric & Felt - but I didn't have any yellow fabric so that put a stop to that option (and yes, of course I could've painted or dyed it but this letter was late already so lets not complicate things any further...)

aaaaanyhoo I had a plan:  Feathers + yellow paint + papers creating a journal page about feathers.  I find them interesting.  Individually they are such gentle, soft, fragile items but put together can have such strength and give such freedom...

I have 2 sets of feather dies - and I wanted to use the smaller ones.... could I find these dies??
NO. I. COULD. NOT.....
would other dies 'do' in their place?
NO.THEY.WOULD.NOT! ....
It was one of those situations where a substitute is NOT going to be good enough/won't work! (I might've had a frustrated mini 'where are the dies, I've looked everywhere' meltdown at this point while creating what started out a such a simple plan)...

So, after what seemed like hours of unsuccessful searching, I created the page without the feathers - with F now being represented by FRUSTRATING, FIND, and FATIGUE !! it became a page about how I felt at the time of creating, not about the original subject matter.... I like that!

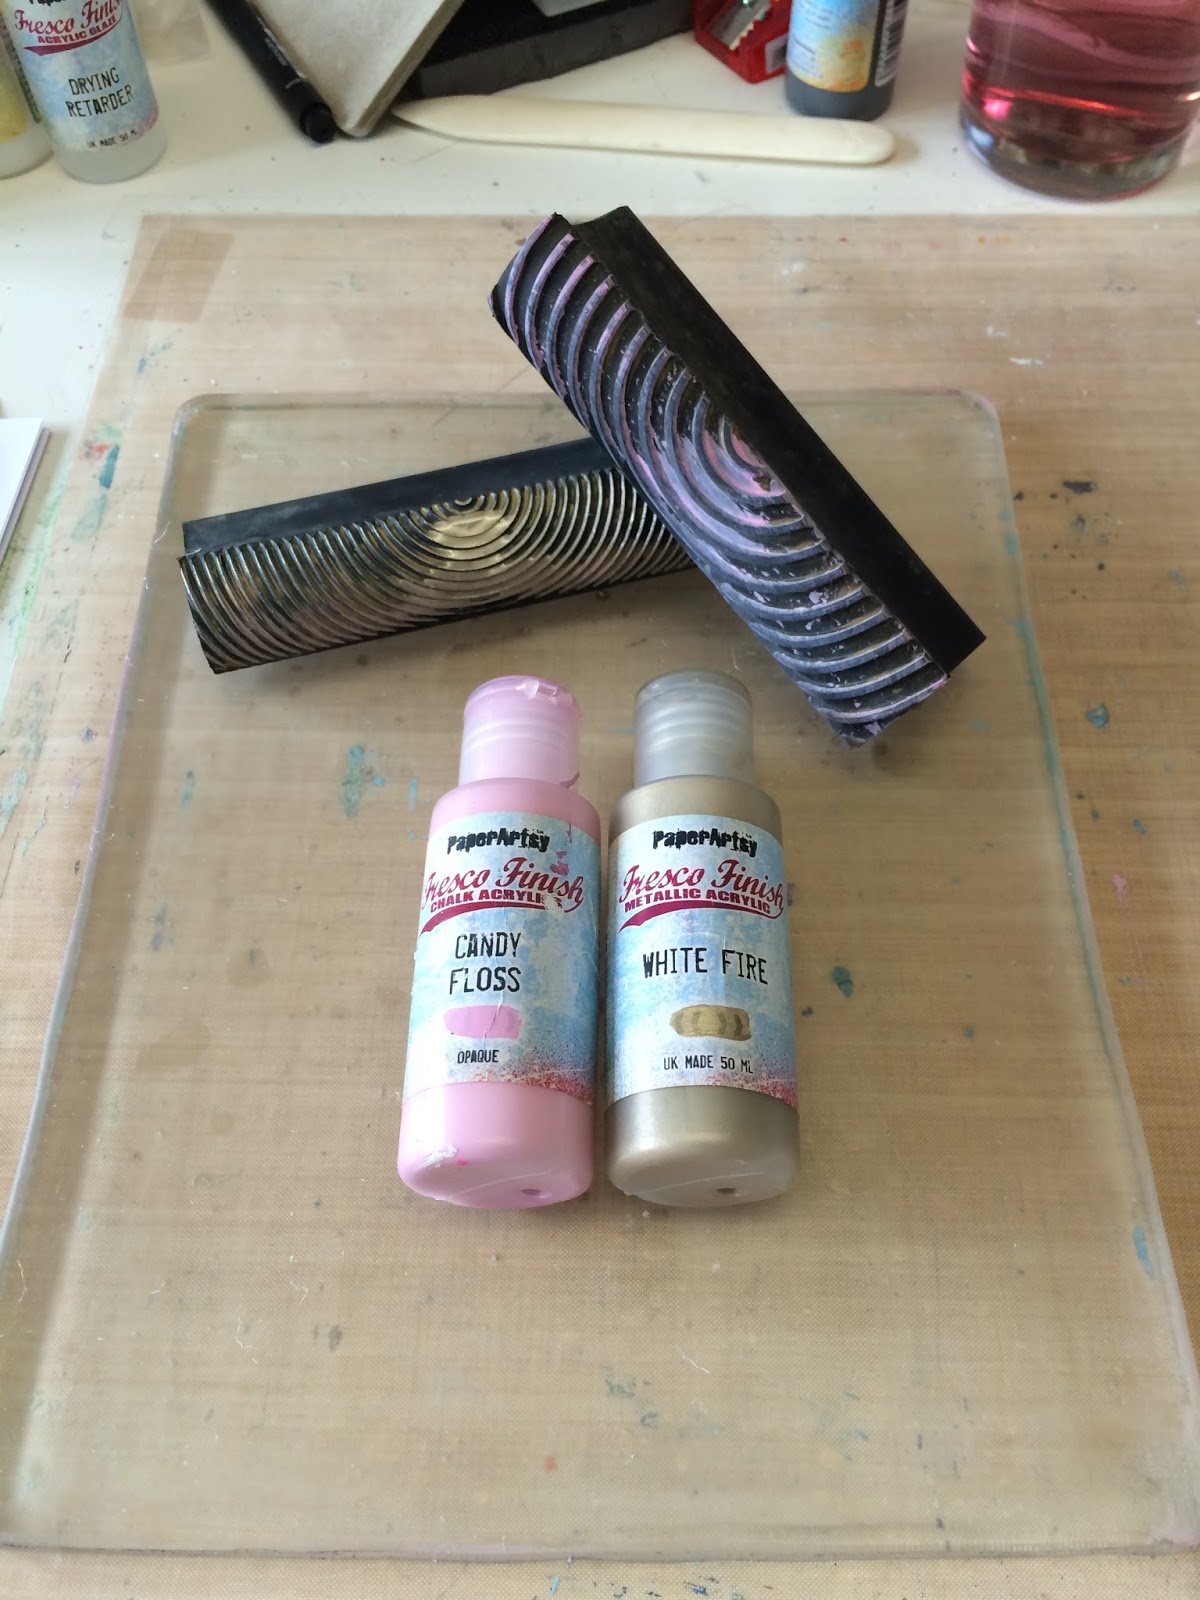
Its a page in my 6in spiral bound journal....  I rollered Slate Fresco Finish around the edges after rollering the paint onto an alphabet foam stamp - love the size of this stamp...

Next I added a wash of yellow watercolour (enjoying working with watercolour paints at the moment)...

then I thought what this page needs is a sprinkling of the new PaperArtsy Infusions - I chose 'Golden Sands'.. then I added a couple of strips of patterned papers....  I like the amount of white space still remaining..
I added the words 'Find!!' (because I reeeeeeaaally wanted/needed to find those dies), 'Frustrating' because NOT finding them was exactly that (lol), and 'Fatigue' because that is what I have and I can't deal with the (not really a)(self-imposed) drama of trying to finish a journal page/project blog post! (Not really life or death is it!)(or rocked science) lol
The die cut gears are there because my gears just don't go round fast enough when I'm fatigued.

I quite liked the page like this... not too bad.... but its missing something... and do you know what that is???

FEATHERS - it is missing FEATHERS.. lol (like a dog with a bone! I just can't let it go!)

So I got out the dies I could find (Sizzix, Tim Holtz - cut and emboss feathers) & die cut two.. coloured them and attached them to the page...

.. and now I really like the page...  and the feather dies that I could find and used turned out to be better than the others because they have texture and detail....

This was a lesson for me - to use what I have and make it work - not waste time & energy trying to find the 'perfect' missing item - the page turned out well in the end - and now has meaning on a completely different level.

Thanks for stopping by

x

PS  remember the mustard trousers from my previous blog post? They've arrived, and they're lovely!! Now I just need to be brave enough to wear them! :o)
Share:
Blogger Template Created by pipdig