I'm not going to beat around the bush - H is for HEXAGONS!!!
I'm slightly obsessed with hexagons at the moment!... ok, in truth its been while now... punches, dies.... gelli plates - boxes:....
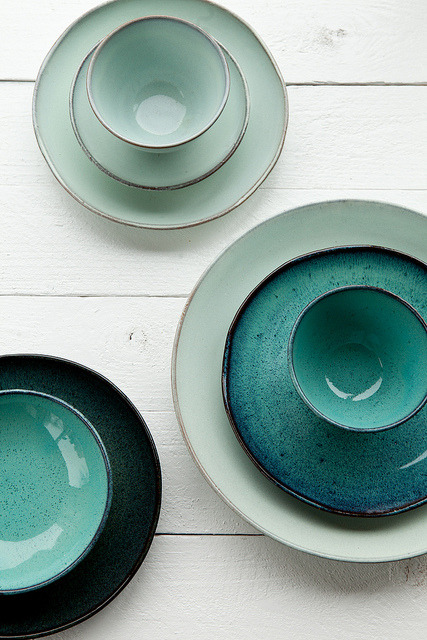
Look at these lovely hexagon nesting boxes I bought on the PaperArtsy stand at AllyPally... I've temporarily put my kokeshi dolls in them to illustrate the size (tallest doll (in black) stands about 17cm) - I like them A LOT (both the dolls and the boxes lol)!! The shape is so on trend at the moment and these boxes make for a more interesting display than square boxes - not that I have anything against square boxes of course...
A couple of years ago there was this scrapbook page... (and the quilt that inspired it..).. lots and lots of hexagons! (the patience my Mum must have to have hand sewn all those!)..

OK, so Hexagons are my theme for the last part of April's Pale Pink month (and yes, I am aware that its now May - where is this year going!!!)... I chose to use the colours below with the hexagons... (I didn't actually use the pale pinks but have put them here to illustrate the palette I'd chosen)(and I actually picked several other paler colours as the project progressed)
I like the look of pale pink with pale blues and grey (pink and grey together look great on their own, and in my book Slate/dark grey goes with EVERYTHING)
This is the finished project.... or so I thought... the more I looked at it the more unfinished it seemed... (you'll see what I mean later)
Let me show you how I made this - its not overly complicated... The substrate is a 10x14in board canvas - this is quite big for me - I'm itching to go bigger with projects but I'm doing it gradually :o)
Painted the canvas with a wash of slightly diluted 'Space Cadet' paint
I didn't want a 'solid' base coat and so I broke it up by removing the paint 'ragging' stylee - ie crumple up a piece of kitchen roll and dab the surface....
I decide this was too dark so I added paint (Hint of Mint) using kitchen roll again....
Still not happy with it, I added some 'Chalk' and 'Slate' ... the kitchen roll was being used a lot for this project... I really like how this looked (the photo below is a close-up) started to have lots of lovely paint layers and texture... but its now what I wanted so..
I painted over the whole piece with a wash of Antarctic' and 'Chalk Fresco Finish paints and laid on the die cut pieces of pink patterned paper...
but it still felt too dark so I repeated with another wash of the colours...
I laid the pieces on again and now I was happy... I think its important to keep checking (if its possible) how the different layers are looking and working together as you go along... because you can then tweak colours, finishes and layouts...
The stencil I'm using is from Artemio - I love it because its so big! (Its the one I used on my suitcase
HERE ) I laid it on, checking that it worked with the position of the pattered hexagons
It would bother me if the hexagons weren't straight (!) and so I drew a pencil line down the canvas as a guide to line everything up to
...and glued them down. I'd always planned to cut the hexagons off at the canvas edge but I really like how they look hanging off the edges...
I stenciled the flowers in Slate - I like the bold contrast - black would've been to harsh...
To finish the canvas off I die cut the word 'Hope' (using Sizzix Serif Essentials dies) and painted it with Slate to coordinate with the stenciled flowers. I dry brushed Chalk around hexagons - over the edges and onto the canvas to halp blend the two surfaces, and then I used a Grey Stabilo All Pencil to draw around the hexagons to give them a bit of depth. I dragged the edge of the canvas in Slate. The word 'Hope' was attached to the canvas using 3d foam.
Here's the 'finished' canvas again..
which I liked but felt it was missing 'something' down the left hand side... I wanted to write on it... in my head it was turning into a BIG journal page of sorts - what does the word HOPE bring to mind... what do I hope for?? (I think it about here that I occurred to me that HOPE begins with H which is letter of this post! lol I'd like to say I planned that but it was happy accident!)..
I couldn't bring myself to just write on it... Its a canvas, something to go on the wall - that little inner voice started up: what if its not straight? what if it looks 'wrong'? what if writing on it ruins it!???
So my husband had the 'brilliant' suggestion of writing the words onto acetate and laying it over the top of the canvas to get an idea of how it would look! That was a fine idea!
Biggish writing.... thickish pen... not really liking that...
What about if I wrote IN the hexagons... no, I liked that even less! lol
Then my husband suggested just single words ... die cut like the main word.... another great suggestions - he doesn't often suggest design options/ideas but when he does they are good - he was on a roll!
I dug out my QuicKutz dies (going old school here!) - the perfect size! and so quick and easy to use with the Big Shot!
I cut words out - 'eternal' 'weather' and 'well' using the QuicKutz dies and then 'Cure' using the Word Play die from Sizzix (I wanted that word to be bigger) I painted these words in a mix of Slate, Space Cadet and Chalk - I didn't want these to distract from 'HOPE'. These words were glued flat to the canvas surface and I wrote phrases and journalling around them in grey felt tip pen - white was too pale, and black would be too strong/bold... I didn't want the handwriting to be too obvious.
Here is the finished canvas (yes, now definitely finished!)
Woah that was a long post!
Thanks for stopping by - and as its now May I'll be moving onto a new colour and 2 new letters very soon....
xx