Hi
Over on the PaperArtsy blog last night (02.04.2018) I shared my Summer flower bunting (you can see it here) and when I'd finished making the banner I had pennants left over.. I mentioned that I'd create something with them... maybe something with letters... and here it is... flowers and bunting bring me joy so this seems very appropriate!
(The big die cut letters are 'serif essentials' by Sizzix)
Thanks for stopping by..
Mixed-media paper crafter; stamper, freelance craft tutor, designer of PaperArtsy JOFY stamps
3 April 2018
12 June 2015
Bunting!!...
Yes, bunting... I think I may have mentioned on this blog that I like bunting - I do! Its such a happy decoration!
So you can imagine how happy I was when I found the WeRMemoryKeepers Banner Punch Board!!!!
Be still my bunting loving heart! :o)
I demo'd the board at The Craft Barn's recent Summer Craft Fest (you can find them here on the shop's site). I made bunting in all sorts of shapes, colours and sizes through the day.. and had time to stamp and make a simple bunting for the shop too...
Here's my clean and simple display at the start of the day... showing the basic shapes that the board creates: pennants from 1inch through to 8.5inches...
I think the small sizes would make great flags for cupcakes (or for a coconut macaroon as I used here).
I mounted a strip of bunting onto a bamboo skewer for ease of showing people how to create a phrase/word bunting during the demo day - these are pennants measuring 2.5in top to bottom - great for the top of a bigger birthday cake, or across a 12x12 scrapbook spread.
The Banner Punch Board is so easy to use - 3 simple cuts will create the basic shape and the icing on the cake is that the board also punches the hole need for the hanging thread! What's not to love about that!
During the day I cut and stamped this bunting for the shop - the flower stamp is from JOFY36, and the 'stitched' scallop border along the top edge is from JOFY31.
More bunting! Left to right:
1. I discovered that I could cut a window out of a flag - would look great with laser cut paper laid across the aperture(attached on the reverse), or vellum so that light could show through... or acetate..;
3. Stenciled pattern;
2-4. Craft Barn pennants:
5. another aperture flag:
6. the final flag on right has a smaller contrasting pennant laid on top - easy to create the mat and layered effect because the board works on the same angle, just different heights/lengths.
While I was experimenting I discovered - a bit by accident - that I could cut chevrons (!!) using the board... and here's a simple step on how to:
Cut a length of scrapbook paper/card - this one is 1.5 x 12in (you can adapt the sizing to suit your need).
Lay the strip up the centre of the board matching up the 1.5in marks so that it is central and straight- its important that the paper is central or your chevron point will be unbalanced
Cut the first chevron, running the blade across the two top edges. I discarded this shape as had a straight top - not what I needed.
Now you the strip has pointed/chevron ends - you need a 'measure' point - I used the top 8.5in marked line (shown above) to position my paper for each additional cut. Position. Cut. Remove. Position. Cut. Remove.... this is the result!!:
And this is what I created with the chevrons:
(the card measures 12.5cm/5inches) 'thanks' die cut is Poppy Dies (1118 thanks), flowers are Creative Expressions (Dandelion heads)
I had a lot of fun with this great board - makes bunting soooo simple and people LOVED that fact that it punched the threading holes - a serious selling point! :o)
(nb. I bought this product, all views are my own)
x
So you can imagine how happy I was when I found the WeRMemoryKeepers Banner Punch Board!!!!
Be still my bunting loving heart! :o)
Here's my clean and simple display at the start of the day... showing the basic shapes that the board creates: pennants from 1inch through to 8.5inches...
I think the small sizes would make great flags for cupcakes (or for a coconut macaroon as I used here).
I mounted a strip of bunting onto a bamboo skewer for ease of showing people how to create a phrase/word bunting during the demo day - these are pennants measuring 2.5in top to bottom - great for the top of a bigger birthday cake, or across a 12x12 scrapbook spread.
The Banner Punch Board is so easy to use - 3 simple cuts will create the basic shape and the icing on the cake is that the board also punches the hole need for the hanging thread! What's not to love about that!
During the day I cut and stamped this bunting for the shop - the flower stamp is from JOFY36, and the 'stitched' scallop border along the top edge is from JOFY31.
1. I discovered that I could cut a window out of a flag - would look great with laser cut paper laid across the aperture(attached on the reverse), or vellum so that light could show through... or acetate..;
3. Stenciled pattern;
2-4. Craft Barn pennants:
5. another aperture flag:
6. the final flag on right has a smaller contrasting pennant laid on top - easy to create the mat and layered effect because the board works on the same angle, just different heights/lengths.
While I was experimenting I discovered - a bit by accident - that I could cut chevrons (!!) using the board... and here's a simple step on how to:
Cut a length of scrapbook paper/card - this one is 1.5 x 12in (you can adapt the sizing to suit your need).
Lay the strip up the centre of the board matching up the 1.5in marks so that it is central and straight- its important that the paper is central or your chevron point will be unbalanced
Cut the first chevron, running the blade across the two top edges. I discarded this shape as had a straight top - not what I needed.
Now you the strip has pointed/chevron ends - you need a 'measure' point - I used the top 8.5in marked line (shown above) to position my paper for each additional cut. Position. Cut. Remove. Position. Cut. Remove.... this is the result!!:
And this is what I created with the chevrons:
(the card measures 12.5cm/5inches) 'thanks' die cut is Poppy Dies (1118 thanks), flowers are Creative Expressions (Dandelion heads)
I had a lot of fun with this great board - makes bunting soooo simple and people LOVED that fact that it punched the threading holes - a serious selling point! :o)
(nb. I bought this product, all views are my own)
x
29 July 2014
Bunting, bunting & ....
... lots of cards were created at the Stamp Attic this weekend by 2 groups of lovely ladies... here are the bunting ladies (without Fiona who left before the photo call) (so busy creating on saturday I didn't get a chance to round them all up and take any photos! lol)
Lovely to see the different colour variations that were created... I love that aspect of teaching classes.
I couldn't resist this pack of MyMindsEye paper - love the grey/blue/mustard colour scheme
Came home, and had a quick wander around the garden to find that the honeysuckle had, at last, started to flower - how lovely are these delicate blooms:
It was fun weekend - lots of laughs and creativity - looking forward to returning in September..
x
25 July 2014
What nicer way to spend a day...
... than to make a line of bunting...
which is what we'll be doing in the class I'm teaching at The Stamp Attic on Sunday ... stamping, painting, & stenciling to create a line of mdf bunting... there's still time to book your place - contact the shop and come and join the fun.
x
which is what we'll be doing in the class I'm teaching at The Stamp Attic on Sunday ... stamping, painting, & stenciling to create a line of mdf bunting... there's still time to book your place - contact the shop and come and join the fun.
x
15 July 2014
BUNTING (& Cards)!!
I think I've said before how much I love bunting! and whats not to love - its a happy, pretty & decorative feature to have in the house or garden...
I thought it was about time that I taught a class creating bunting....
That's what we'll be creating on the Sunday - while on Saturday 26th we'll be creating cards with a nod to the men......
I'm looking forward to the weekend - hope you can join me. Go to the Stamp Attic website for details and to book your place.
Bunting and card making - what's not to look forward to! lol
x
I thought it was about time that I taught a class creating bunting....
So that's what I'm doing at The Stamp Attic on the 27th July, as part of my weekend of workshops at this lovely shop... this makes me happy - bunting and being back at The Stamp Attic with Wendy and her lovely customers... The bunting can be hung inside or out in the garden...
That's what we'll be creating on the Sunday - while on Saturday 26th we'll be creating cards with a nod to the men......
I'm looking forward to the weekend - hope you can join me. Go to the Stamp Attic website for details and to book your place.
Bunting and card making - what's not to look forward to! lol
x
19 November 2012
another 'not so minimal mini'....
.... and more bunting (because you can never have too much can you!? lol)

Pennants use minis 01,02,03 and the very useful grid sketch from JOFY02... pennants are Sizzix dies, and one of my all-time-favourites dies Spellbinder 'floral flourishes'....
(and look - no sign of Iced Spruce or Evergreen Bough distress inks.. I'm moving forward! lol)
Have a good day
Pennants use minis 01,02,03 and the very useful grid sketch from JOFY02... pennants are Sizzix dies, and one of my all-time-favourites dies Spellbinder 'floral flourishes'....
(and look - no sign of Iced Spruce or Evergreen Bough distress inks.. I'm moving forward! lol)
Have a good day
18 November 2012
Deck the halls....
... with pennants and bunting... tra la la la laaaaaa la la la laaaaaaa
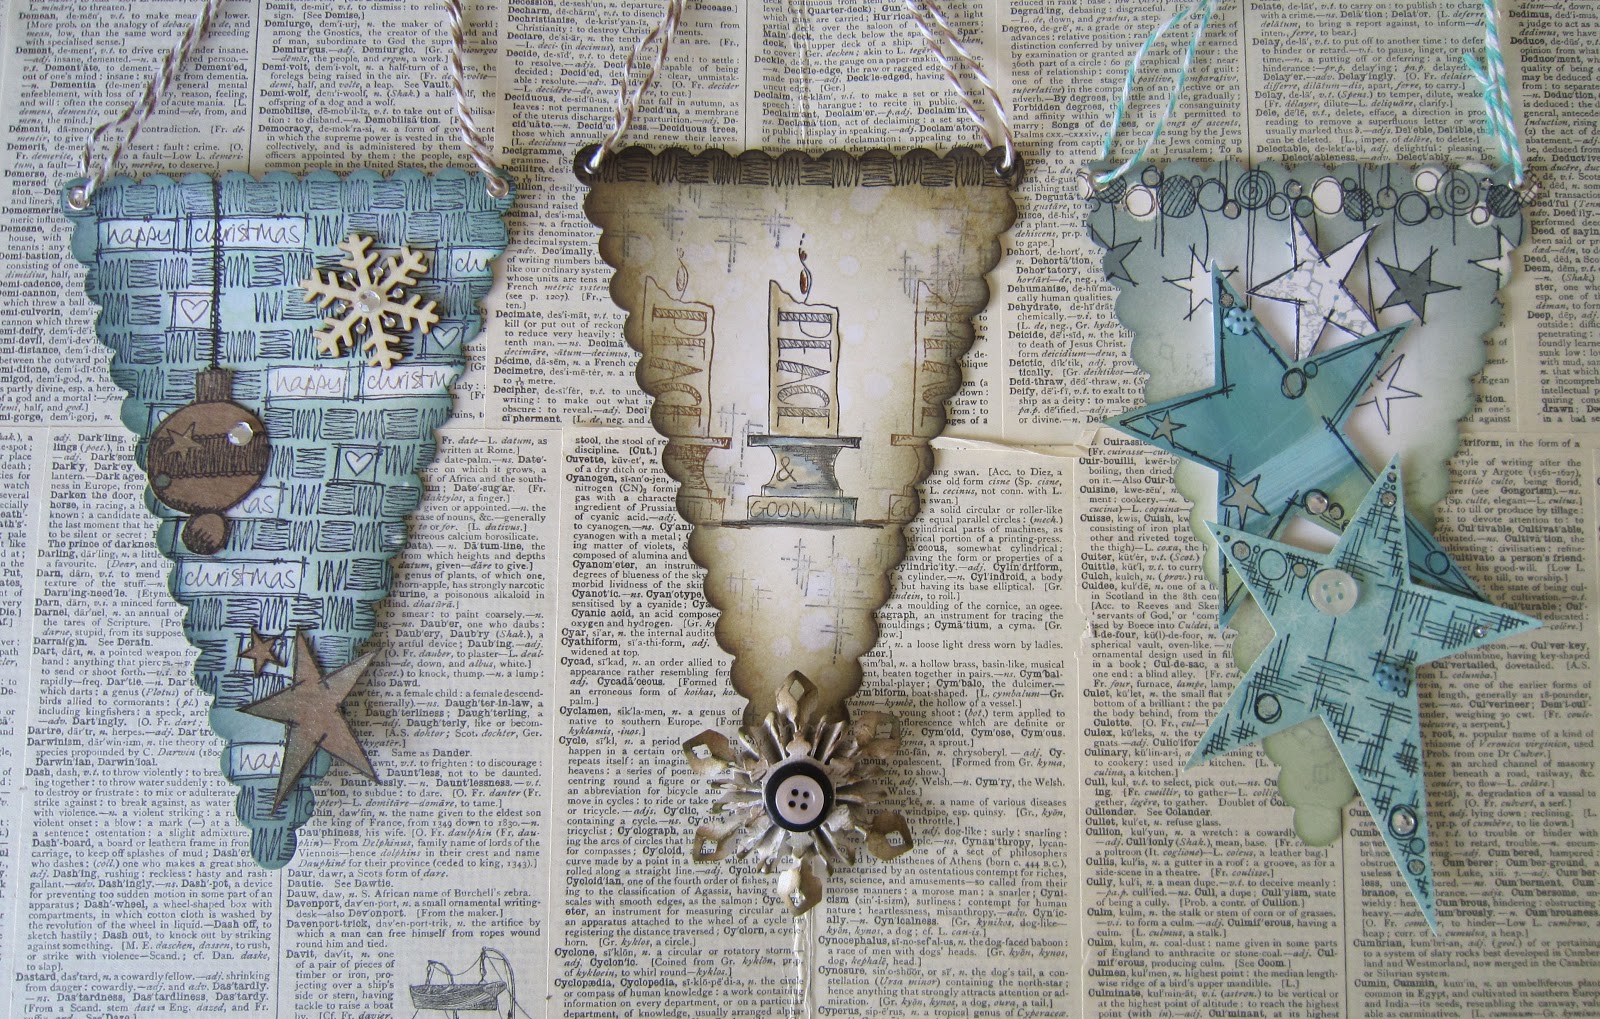
Usually when I'm playing around with new products I create tags but at the moment I am creating pennants instead (as I've said before I love a bit of bunting!)...
and talking of favourites - distress inks - Iced Spruce and Evergreen Bough - my 'go to' colours this christmas - possibly using them a little too much! Jo, put the inks down, and move away from the worktable.. lol
...and just in case you were wondering - christmas is about 36 days away... just sayin'.....
Usually when I'm playing around with new products I create tags but at the moment I am creating pennants instead (as I've said before I love a bit of bunting!)...
The above pennant uses the border strip from plate05 with the words on same plate dotted about - love how this turned out - the border is really easy to repeat if you mark on the back the position of the end blocks.
The motifs stamped onto kraft card are from minis.
Speaking of minis: I used the candle on mini08 on this pennant and combined it with the border strip across the top edge:
The candle is coloured with Distress Markers- being from the same palette as Distress inks they tone in perfectly, I like them a lot...
The embellishment on the centre tag is one of the snowflakes created with the Tim Holtz Sizzix die, aged with distress inks.. they're fiddly but i love 'em!
I know I'm shouldn't choose but I think the star pennant is my favourite - stars from several plates: top banner is plate01, big stars plates07 & 08, the white star top centre is from the minis over stamped with snowflakes (also on background) plate01.
I had fun creating these and they work as inspiration for other projects... These pennants are about 15cm long - don't you think little ones strung on a piece of ribbon around a christmas tree would look cute...and talking of favourites - distress inks - Iced Spruce and Evergreen Bough - my 'go to' colours this christmas - possibly using them a little too much! Jo, put the inks down, and move away from the worktable.. lol
...and just in case you were wondering - christmas is about 36 days away... just sayin'.....
12 July 2012
Its not that I've been overly busy... just a bit here and a bit there and lots of things going on in all areas... that why I've not been here so please excuse the absence..
So what has the 'here and there' been all about?
Well we've moved into our new house and we're still unpacking boxes - well, to be honest with you I'm not unpacking them as much as moving them about from one room to another! lol (they're currently in the 3rd bedroom where I can close the door and ignore them for a bit longer :o) )
The house keeps throwing up interesting findings - under most of the floor coverings is a layer of newspaper (insulation 1960s stylee?) which is normal but in the bedroom was so exciting as the newspaper print had transferred onto the wood!!!! (insert excited squeal here) I wanted to varnish over it and keep it, but sadly I was out-voted... its a snapshot of August 1960! lol very cool!
A lovely weeked was had by all that went to the Craft Barn's extravaganza a couple of weekends ago - I really enjoy being part of these weekends.. this time I was flexing my die-cutting, bunting making, fabric cutting craftiness.. thanks to everyone who stopped by and said hello- it was nice to put faces to some of the twitter peeps I've met :o)
I combined Sizzix dies with Spellbinder dies to create this line of bunting - these are great dies (and I can't wait to combine them with the latest PaperArtsy dies - more about those later).
So what has the 'here and there' been all about?
Well we've moved into our new house and we're still unpacking boxes - well, to be honest with you I'm not unpacking them as much as moving them about from one room to another! lol (they're currently in the 3rd bedroom where I can close the door and ignore them for a bit longer :o) )
The house keeps throwing up interesting findings - under most of the floor coverings is a layer of newspaper (insulation 1960s stylee?) which is normal but in the bedroom was so exciting as the newspaper print had transferred onto the wood!!!! (insert excited squeal here) I wanted to varnish over it and keep it, but sadly I was out-voted... its a snapshot of August 1960! lol very cool!
A lovely weeked was had by all that went to the Craft Barn's extravaganza a couple of weekends ago - I really enjoy being part of these weekends.. this time I was flexing my die-cutting, bunting making, fabric cutting craftiness.. thanks to everyone who stopped by and said hello- it was nice to put faces to some of the twitter peeps I've met :o)
I combined Sizzix dies with Spellbinder dies to create this line of bunting - these are great dies (and I can't wait to combine them with the latest PaperArtsy dies - more about those later).
This simple calico bunny makes me smile - The Craft Barn sells plain Calico animals and shapes (by Rico Designs) and so I made a 'critter' version with it. cute.
OK, onto the newPaperArtsy stamps I mentioned - 5 fabulous haberdashery sets, here's just one of them:
I love all of them - but this one especially as that's my sewing machine! :o) Mr PA took photos of it and turned it in to a stamp - how cool is that! Go over to the PaperArtsy site to see the others - they are really lovely....
The Olympic Torch came through our town because Hadleigh is the venue for the Mountain Bike events(and it came through Southend because of the dive centre etc).
It was really quite exciting - the whole Torch Relay has been so well planned and organised.. great to see it (briefly! lol definitely worth standing in the drizzle.)
I think that's enough for now - I'll leave you with some more fabulous flowers - not mine - these were planted (by the council) in beds on the local cliffs - so beautiful and they were so fragrant, and the orange/pink ones were stunning...
Take care.
8 February 2012
ACP Week 6: Red + H = Hearts!
OK, this week on the 'Alphabet Colour Project' I am bending the rules slightly - they're my rules and I'll bend them if I want to!... and I'm bending the rules for very good reasons: because February is Valentine's month and if I run to schedule 'H' (8th letter and week) would fall after Valentines day.. and so my lovely heart projects would be too late! So this week will be 'H' and I'll revert back to normal alphabet pattern.
This week I've teamed red with cream which is a lovely colour combination, a classic combo
H = Hearts
Three box canvases with a heart theme - I've accumulated quite a lot of vintage buttons and so its time to use them on projects.
Remember the bunting I made for a shop? ... here it is in situ - made in different, more striking colours. Reflections, daylight & indoor lights did not make it an easy thing to photograph - but you get the idea.. I was really pleased with how it turned out.. and so was the shop. :o)
15 January 2012
ACP Week 2, part 2: can you ever have too much bunting?!
NO, you can never have too much bunting! & bunting doesn't have to be mean lines of triangular pennants:

This is a trial bunting line I've just made for a shop valentine window display - oh yes: christmas is over & Valentine's Day is just around the corner..... just saying! lol (next it'll be Easter!)(I'd lay money on some of the supermarkets having easter produce in already!)
The bunting needed to be a big'n'bold(ish) as it will be seen from a distance - so no fine detail - but I couldn't resist some book text!... but it still looks dainty doesn't it - I think this is because the hearts are hanging at different points on the shape, the colours & the spacing... (if all the hearts had be sewn across the tops it would look too regimented, don't you think?)

This is a trial bunting line I've just made for a shop valentine window display - oh yes: christmas is over & Valentine's Day is just around the corner..... just saying! lol (next it'll be Easter!)(I'd lay money on some of the supermarkets having easter produce in already!)
The bunting needed to be a big'n'bold(ish) as it will be seen from a distance - so no fine detail - but I couldn't resist some book text!... but it still looks dainty doesn't it - I think this is because the hearts are hanging at different points on the shape, the colours & the spacing... (if all the hearts had be sewn across the tops it would look too regimented, don't you think?)
All sewn onto string for hanging.. not only does this bunting make me happy but it makes me come over all romantic! :o)
Today I deviated from the grey theme (I was multitasking)(unless we count the book text as dark grey?) - back to the strict(ish) plan tomorrow when grey will be back with a different accompanying colour and theme.
Enjoy the rest of the weekend.
x
12 January 2012
ACP Week 2: Grey + B = Bunting
There were so many crafting options to choose from beginning with the letter B including bottles, birds, bleach, buttons (of course! lol), bottles tops - but on this run of the alphabet this is my choice.
B = Bunting
I think I've mentioned several times (at least lol) how much I like (love!) bunting - it makes me smile - its such a happy joyful decoration - village fetes, christmas,etc etc etc... I have several projects lined up this week featuring bunting...
I teamed grey with pinks for todays project- pink and grey seems (to me) such an 80s colour combo but like everything else 80s its seems to be making a bit of a comeback....Today's projects are nice, cute, & simple cards.
Thanks for popping by!
Jo
8 January 2012
ACP Week 1: Grey + A = Aperture
The letter of this week is A, & I'll admit it is skidding in on the last day but that's because I was busy posting all the introductions to the project I've started - next week: less talk, more projects :o)
Throughout the year I'll by putting the main colour together with other colours - and grey has been a nice colour to start with - I like grey a lot - and colours seem to go with it really easily.... today's project uses grey with yellow.
A = Aperture
Today's project is quick'n'easy! This is a card design I've used before (taught it as part of a class) and I really like it - simple but effective (and using 3 types of paper its a great stash-buster!) - I like that the aperture becomes a window: I covered the aperture with acetate - makes a great space for mounting something - this time a fabric flower that I added a sparkly button to the centre of (more of those later in the month)... The die used to cut the aperture has to be one of my favourite Spellbinder dies - Labels 1.
The funny little mannequin to the side is a Lego piece - I came across it on Ebay and couldn't resist it - it just makes me smile - I have dressforms/mannequins in several sizes - life size all the way down to Lego size - got it all covered! lol
Aaaaanyhoo back to the project.... if the design or colour combo has inspired you please leave a link to your blog in comments & I'll pop by and have a snoop at your creation :o)
Thanks for popping by!
Jo
Aaaaanyhoo back to the project.... if the design or colour combo has inspired you please leave a link to your blog in comments & I'll pop by and have a snoop at your creation :o)
Thanks for popping by!
Jo
Subscribe to:
Posts (Atom)
©
JO FIRTH-YOUNG | All rights reserved.