Mixed-media paper crafter; stamper, freelance craft tutor, designer of PaperArtsy JOFY stamps

8 April 2015

oo la la!

... I'm all packed (well, almost) and ready (eek) for my trip to Paris to demo and teach classes at VersionScrap!  (just a liiiiitttle bit excited!)..


I will be on the PaperArtsy stand (Boutique 01) on Thursday night demo'ing (VIP event) alongside Leandra and Lin Brown - and then teaching 3 classes on Friday - its going to be a lot of fun (hardwork but still a lot of fun!).
One of the classes has sold out, but there are still a few places up for grabs on the Journal & Block class (love these projects!) here are the sneek peeks (and go HERE to book a place)

This is the first class of the day, 10:00 (for 2.5 hours), 'Block of JOFY Flowers'

.. and 'Mini Journal' is at 13:00 (2.5 hours), this is a lovely journal/sketchbook, notebook - all wrapped up..

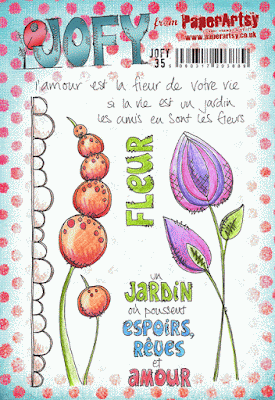
And there are new stamps!!!  I wanted to design something especially for the show and here they are.. all new images, new phrases and a couple of translations from the most recent English releases (and the spiky flower on JOFY36 fits onto stencil PS009, this time it fits inside within the stencil)


Really looking forward to VersionScrap - everyone says its a lovely show and I can't wait!! 


I got my suitcase out a few days ago - I wanted to give it a 'makeover': one black Carlton suitcase looks very much like every other as they are trundle around the luggage carousel at airports so,  and showing again Fresco Finish paints can be used on pretty much everything, I stenciled an image on the front and back..

I love it!
I recently tweeted reasons to customise luggage:
1. easy to spot on a luggage carousel
2. Ensures partner doesn't borrow it.
3. Its pretty!!
and I'm adding a 4th reason to the list:
4. Why not! 

(I'm travelling to Paris on Eurostar, and yes, I know my newly prettied up luggage won't be on a luggage carousel..)


I think Bertie cat wants to come to Paris - he made himself quite at home IN the suitcase... but I explained that he can't come because he doesn't have pawsport - get it pawsport/passport... no, ok then.. moving on... (apoligies - that was like a christmas cracker 'joke' wasn't it - groanworthy! lol)... aaaany hoo


Then he staged a sit on protest... cute! but still not coming to Paris!


OK, I'd better go and finish packing.. and brush up on my French...

x
Share:

6 April 2015

Mono printing with a gelli plate ....

... again...
I think making gelli prints might be a little bit addictive - no idea yet what I'm going to do with all the prints but am enjoying the learning/experimenting (re-learning/re-visiting) process.. also I'm sharing/showing you these because I can't show you other secret bits and pieces I'm currently working on ....


I'm printing onto 120 weight paper - the sort you'd use in your printer - I find its strong enough to take the paint but still light enough to find all the nooks, crannies and detail of a stencil.
Even though I'm using the larger gelli plate I'm still pulling A5 prints too..

Like this one, the very first (a5) print off the plate (that's why there are tiny bubbles in the print- a coating of some sort)  - the plate was coloured with Tinned Peas and Chartreuse blending with a roller, then I removed some paint with bubble wrap):

 ... then pulled this print - I like the way the a5 print has created a clean space and a 'frame' print on the a4 sheet:

 and this is the two prints laid up together:

Here's a Mermaid version (everything looks nicer when its painted Mermaid! lol).. I think this started as a 2nd generation print as the background isn't a solid colou, and I'd also laid onto the plate 3 die cut scribble circles to act as a resist.... this is the a5 print that I pulled and when dry added a print of bubble wrapped rollered in Bougainvillea (Mermaid + Bougainvillea = FAB colour combo! lol)

The remaining colour print pulled to reveal a frame (as before)

and the two laid up together:

These are mixed prints - clean up prints or the 'lets see what this looks like' prints - and also prints where I've 'stamped' bubble wrap onto to a ghost/clean up print - I like these - the print is less blocky and you have all these subtle images, layers and colours.

This 'print' is actually a page where I cleaned the roller several times - I like it! lol  nothing's wasted... & afterall - its just paper - whats the worst that can happen..

I can see these prints all being made into a journal, or stamped onto to create a masterboard.... so many options.. and one print leads to an idea for another print - its quite addictive...
and what I also like about it is that its surprisingly 'un-messy'! - all the 'mess' is on the plate which is cleaned up by making another print!  bazinga!

Mono printing with a gelli is fun and relaxing - I think everyone should give it a try :o)

(I have been using the Gelli Arts® 8x10in and 6x6in plates)


I hope you've all had a lovely Easter weekend.

x
Share:

ALBOTAT: Messing about with a gelli plate again....

... and this time with the large plate - roughly A4 size....

'inked' up the plate with Tinned Peas and Chartreuse Fresco Finish paints, lifted some paint with doily masks and pulled a print.  I then covered the plate with Bougainvillea and another stencil and using the doily print pulled this:

.. its not perfect but I'm really enjoying playing with the plate - building layers, creating contrasts between delicate prints (the doilies) and a block print (the flowers) -  for me its about embracing the imperfections of the prints...

I removed the stencil from the gelli plate and there was still enough wet paint to pull a final print.. which I doodled onto (when dry) - spots had been left on the gelli plate after removing the stencil and so I highlighted/used these and made them part of the image...


This was fun to do - reminding myself that 'its just a piece of paper', gelli prints at this stage are almost 'disposable' aren't they - playing around with the process...
Share:

1 April 2015

ALBOTAT: Brayered background card...

... that I made for my Mum-in-Law for Mother's Day...

The long white flower/seed stems are a Clarity Stamp stencil - I thought it worked really nicely with my bull rush stamp.

Here are the colours I used to created the brayered background - unusually they are all opaque which built the background up to be quite textural and similar to a matte pottery glaze.


 I cut it in half and edges the panels in different colours to see how it changed the look...

Fun card to make, and interesting to see how you can change the look of the pieces at the last moment by colouring the edges.

x


(PS - the colour change in the brayered backround between the first and last photos is caused by change in lighting - I either turned the lights on or off ... not sure which, sorry!)
Share:

31 March 2015

VersionScrap!!!

Next week I am joining PaperArtsy over in Paris at the VersionScrap show - AM VERY EXCITED about this!! (and a little bit nervous - & wish I could remember more of my o'level french! lol)

PaperArtsy will be there for the entire show, but & I'm going for a couple of days: on Friday I'll be teaching 3 classes - here are sneekpeaks - I love these projects and can't wait to teach them (with essential translations provided by the lovely Sally, my interpreter for the day!).
There are a couple of place left on the first 2 classes if anyone fancies a trip to France! lol

Block of Flowers
10 April 2015, 10.00 - 12.30
In the class we'll create a lovely hanging wood block using techniques with paint, JOFY stamps, inks and pens. Learn the versatility of PaperArtsy’s amazing Fresco Chalk paint onto wood, card and papers with the gorgeous JoFY flower stamps. A little bit quirky, and very funky-modern in style, this wood block will look stunning in your home.


Wrapped Journal
10 April 2015,  13.00 - 15.30
The class is all about creating a gorgeous wrapped up mini book / personal journal using layers of new Fresco chalk paints, new JoFY stamps, die-cuts, paper and more.


Layers of Loveliness - sorry, this class is sold out.
10 April 2015, 16.00 - 18.30
A relaxing and enjoyable class creating a canvas panel learning lots of paint and stencil techniques along the way. I will show you how to put together multiplelayers with JoFY stencils, stamps and die cut shapes.


Go HERE for more details of the show and to book your place on either of the two remaining classes.

x
Share:

ALBOTAT: A 'Thank you' card

... using a panel of masterboard, a die cut and a stamped sentiment...


(sentiment: JOFY33, die: Memory Box Shrewsbury Stems, background Tinned Peas, Chalk, Buff)
Share:

25 March 2015

ALBOTAT: Just messing about....

... with a gelli plate a few days ago- this is the result - single layer prints using Fresco Finish and a Daler Rowney paint..  I'd been looking for a bright pink paint - a pink so bright it would make your eyes water lol - Flourescent Pink from Daler Rowney fits the bill! love it!

This post is more about this colour combo (it makes me happy) than the prints.....


The turquoise tones are Mermaid and Beach Hut Fresco Finish - LOVE!!  The stencils are Crafters Workshop.

Next 'play time' with the plate will be several layer and different substrates....
Share:

16 March 2015

I'll be getting 'buzz-y' at Blade Rubber Stamps...

... this Saturday with a workshop decorating a canvas and cards..


There are still a couple of places left so if you fancy an inky painty creative day then contact the shop to book your place..

Hope to see you there

x
Share:

15 March 2015

The first of many....

.... cards being made this month:


I used the background and butterfly stamp from JOFY32 to create this pretty 13x13cm card:

I stamped out the butterfly several times and coloured the image using the Fibralo felt pens (used as a watercolour ink by scribbling onto the craft sheet, adding a little water and picking the colour up with a paint brush)... it was quite relaxing colouring different variations..

I stamped the background across the panel of card and painted random hexagons in Mermaid, Turquoise, Jade and Snowflake Fresco Finish paints... I stamped the image onto book text, cut out circles and stuck them onto to the corresponding image..

The greeting is from JOFY14..

x
Share:

9 March 2015

Paint, paint, stencil, stamp....

Paint, paint, stencil, stamp....

Paint, paint, stencil, stamp....

Paint, paint, stencil, stamp....

This is how I spent the weekend and enjoyed every minute! Here is a selection of samples, thanks to everyone who came to the two demo days at:

*  The Craft Barn - I'll be here again on April 26th for a class - see the website for details, and to book a place


*  & Birds in the Barn - I have a day of card classes here on May 2nd - ring the shop (01206 211099)  to book a place.

This sample is unfinished but I wanted to share it with you - I like the mix of painted and paper-pieced elements:

If you bought products at either day I hope you enjoy and have fun with them.

x

Share:

6 March 2015

A weekend of JOFYness

This weekend I will be in two places - yes TWO demo'ing the latest JOFY stamps, paints and stencils - it seems aaaaages since I've done this and so I'm really looking forward to both days very much...

On Saturday I'll be at The Craft Barn, Nutfield inSurrey


and on Sunday I'll be at Birds in the Barn, Marks Tey near Colchester in Essex.

I hope to see you at either of these lovely shops


x
Share:

3 March 2015

Happy Birthday card ....

... for a friends recent birthday, using new JOFY stamps - I had fun (as usual) playing with the stamps and creating the card - which is good because March is a really busy month in our house for card requirements - birthdays, wedding anniversaries and Mothers Day  of course! (15th March in the UK, in case you're wondering)...


... and look! - I'm still embracing yellow!!

The flower stamps used are JOFY33, 'birthday is a stamp from the stamp drawer and I have NO idea who made it - sorry!  the die is 'happy trio' from Wplus9 , papers from Crate Paper.

x
Share:
Blogger Template Created by pipdig