Mixed-media paper crafter; stamper, freelance craft tutor, designer of PaperArtsy JOFY stamps

28 December 2013

Sometimes its good... part 2

.... so remember the other week when I showed you my little sketchbook and it looked like this:

well I spilled paint on the cover by accident & so had to pretty it up- & now it looks like this (nothing that a touch of opaque Fresco Finish paint can't fix!):

I took the book on holiday with me - a nice portable size - I also took with me a 'travel kit of arty bits' - we went to Mexico for 2 weeks and I'm not good at laying in the sun (I don't go brown fast enough!)(and I get restless - unlike MrJoFY who happily lays in the sun ALL day!)- so I like to pack a 'things to do when the sun gets too hot!' emergency kit... (which probably helps to explain the weight of my suitcase lol)

Its not just the cover that has changed - the pages are looking different too.. as I started working in the book I realised that little flip up/flip out pages weren't the direction I was going in and so they were taken out and re-stuck in the back.. just in case I needed them (too interesting to throw away!)
(I like how these mini pages now flip up, down, sideways & over... interesting ... and great for 'hidden' journaling)

here's part of the 'entrance ticket' page:

On other pages I painted Snowflake Fresco Finish through stencils and then washed over them with Koh-i-noor watercolour (dye) paints and created a resist... then I doodled over the top - love how these turned out..
The page below was a little different - stenciled and painted over the top in 2 colours and then watersplashed the page - flowers on right are created by doodling over the white circles created by the water - trying to disguise or make use of them..
 This page was filled by one big word, and then later added borders - once you start doodling its hard to stop!
Page filled with circles an flowers - doodling circles is very relaxing...
painting, stenciling, bit more painting... bit more stenciling...

The sketchbook is now very inky/painty and is only just closing shut(with the help of a VERY big bulldog clip!) - and this is  how the page edges look - great colour combo...


So thats the quick tour through some of the pages of my mini sketchbook.. I'd really encourage you to try pages/books that are out of your comfort zone or not what you would normally reach for when creating - you might find something that you really like..

xx
Share:

26 December 2013

CHRISTMAS!!!

...is finally here!


MERRY CHRISTMAS!!
Eat(too much), drink(responsibly), & be  as  merry(as festively possible)I hope the season is everything you wish & hope for.

 Merry christmas & best wishes for a fabulous 2014!

Share:

12 December 2013

EDITED: Catch up post number 3.....

I don´t often repeat a workshop but I´m really glad I repeated this one.... a hanging star triptych... these were such fun classes to teach!

First at Its Crafting Time - here are the lovely ladies of the workshop - so nice to see all the different colour versions that were created:


and for my last workshop of the year I taught the class at The Artistic Stamper - again a fun class-
I love the red versions of this project- very festive and dramatic.. Jennie and Valerie (2nd from left back row) added black swirls to their triptychs another striking variation

.. and what do you think - have I found my perfect festive hat??:

ho ho ho!!

Share:

11 December 2013

Sometimes its good...

... to climb out of your comfort zone and try something new.. something a bit different...

.. which is why I bought this little 15x15cm sketchbook:
This sketch book is almost half the size of my preferred choice- 25x25cm... but the biggest (and slightly intimidating) difference is that it is not spiral bound!  Lovely sewn signatures... it is clean, pristine and chunkier than I imagined it to be when I ordered it online... - about an inch thick...
I looked at it for about 2 weeks before I picked it up and said sternly to myself - 'its just a book... something to play in... man up and do something to it'

so I did....

firstly I cut these up - postcard size pages that have been on my desk waiting for 'the perfect project'... (putting them to good use and tidying my desk -bazinga!)
Little lift up pages/spaces for hidden journaling/notes etc.... I stuck them in with Washi Tape so that they could be moved if need be....
 
and then I started painting pages, just randomly painting them - not thinking too much - just putting colour onto the pages - blank enough so that I could work on top of it at a later date...
.. on this background I´ve used an idea that Junelle Jacobsen showed for creating a background - entrance tickets (though she left hers sticking up a little at the edges - I preferred mine fully stuck down.. smoother) - and I have whole roll of  engrance tickets that need using up so I covered the entire double spread with them... (i could´ve covered every page in this book and I would still have tickets left! lol)..
The letters are stamped with a set of letters that I keep in their box and just ink them up - I like the way they stamp up as a block (and the whole set was only £1!!)


.. and once I started altering and working in the book I couldn't stop.... and I'm still playing in it - I'll show you some more pages in a few days...

I'm so happy I moved away from my normal sketchbook size and into something new - I use this book in a completely different way - its almost like a journal... a play book - my 25x25cm sketchbook will always be my 'working' book...

and thats a good thing...
Share:

8 December 2013

and now for something completely different...

... and nothing to do with christmas!!

My lovely hubby Matt bought me a beautiful bouquet of flowers for my birthday in October - and I have only just had to throw them away - how fantastic is that - they lasted such a long time!
(the photo makes the flowers seem VERY lilac/purple lol - they weren't quite so vibrant in real life - quite vintage colours)

  
I loved them - & I especially like the ornamental cabbages - I had them in my wedding bouquet :o)

I had to throw them away but photographed them first - the cabbages were still lovely but for different reasons - look at the fabulous vein patterns.. & the stems!!!!! so so interesting.. and inspiring - love love love!


...and the petals/leaves that had fallen off were just as lovely - if not even lovelier - great colour combo!
and lets not forget the stems!!! like juicy bamboo - camera hasn't really picked up the colours - from pale lilac through to a gorgeous aubergine colours...

forget the roses and the fancy flowers - just bring me ornamental cabbages!

:o)
Share:

6 December 2013

Catch up post 2

I spent a lovely weekend at The Stamp Attic in late November running a card workshop on the first day and on the second day we made this box frame...


it was a lovely weekend of christmas crafting, cracker pulling & general 'ho ho ho'ness.

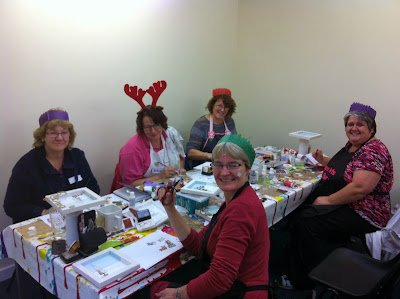
Here´s the group embracing the festive theme of the class:
(& the lovely Wendy was fully embracing Christmas by wearing the stickers that came inside the crackers lol)(the crackers that had surprisingly funny jokes - ´how do monkeys make toast?... they put it under the gorilla´!... lol -  aaw come on - its a cracker joke - its supposed to make you groan! lol)

If you´d like to see another version on the box frame there is a photo in this blog post.

xx
Share:

4 December 2013

cards, cards & more cards....

... not long to go now - I hope you're all on schedule with your christmas cards - just in case you're not here's a little bit of inspiration for you...

Cards created with stamps from JOFY 20, 8, 17, & 18.. Mini 7& 26 on white & Kraft card blanks.
The snowflakes were die cut using Spellbinder Snowflake Pendant 2013, and the paper is Blissful Blizzard from Fancy Pants.
Share:

3 December 2013

Catch up post 1....

... i'm still a little bit obsessed with houses - in whatever form that takes...and christmas gives lots of opportunity for little houses .... (if you'd like to see the other houses click 'houses' on the labels list on the bottom left of the blog...

This house is one I altered for a class at Birds in the Barn a few weeks ago - a lot of fun - and quite a challenging shape..


Created with Fresco Finish paints & Crackle Glaze, JOFY stamps: mini27, 29 & JOFY20,18 & 19.  
The snowflakes around the edge are Sizzix/TimHoltz on the edge snowflakes die- now discontinued (which is a shame), the stand is created from a box of slices of wood by Artemio- they're surprisingly useful! great for stamping onto and for creating structures like this stand.

xx


Share:

18 November 2013

I'll have a bluuuuuueeeee christmas....

...  creating this project in my last workshop of the year at The Artistic Stamper, Faversham.
In this class we'll create a hanging triptych (in colours of choice) using die cuts, paint, sparkly bits & JOFY stamps..

This will be a nice class to end the year on - I love creating triptychs - I think its the panels & small things building up to something bigger.. 

contact the shop to book your place.

I look forward to seeing you!

ho ho ho

xx
Share:

16 November 2013

Before we wind down to Christmas...

... (or are we ramping up for christmas??!)...I have a couple of very christmassy classes booked to teach which still have a few places left - the first of these are at The Stamp Attic on the 23/24 November - the 23rd is sold out but there are still a couple of places left on the sunday.. I'm really looking forward to this class - its to create a lovely wood box frame project using gorgeous dies, paints (there will be crackle!), and JOFY stamps (of course).. it will look lovely as part of your christmas mantelpiece decorations (thats where mine is going...)
I hope you can join me in the class - I'll be the one wearing a christmas sweater!
To book your place visit this page at The Stamp Attic

Look forward to seeing you for a bit of festive crafting
Share:

15 November 2013

oh Christmas Tree ...

... our little black tree (only 3ft tall) is the first to be brought out of storage this year - purely for prop purposes - Decorations that I made with my stamps have been hanging on random door knobs around the house for a while - they need to be photographed and blogged... easier said than done!

I saw this deer head in the Poplar Garden Centre where Birds in the Barn is based - they have a really lovely christmas decoration selection - really nice & unusual ornaments.. - I was quite taken by the angel wings (big enough to wear - & no I didn't try them on!)
 and I was especially with the pairs of polystyrene ice skates - I thought I should have these just to remind me of the day Matt & I went ice skating at the Natural History Museum... I use the term 'skate' loosely - Matt skated - I just clung on to the side for dear life..:o)  & then fell over!  Always graceful! lol

aaaanyhooo - where was I .. deer head - I really liked it - the shape and because its cut from wood .... I bought it even though the strong red is not our festive colour scheme (we seem to have many other colours but not red! - I would love a tree where all the decorations are red, white and wood...hhhmmmm)... so I bought it home and..... ta daaaaa:

I Crackled Glazed it! Simple and effective... Much more in keeping with our other decorations...

I decorated one of the wooden hearts (available from the PaperArtsy website soon) with crackle (I do love a bit of crackle!), I stamped JM32 (Angel) onto the crackled wooded heart and onto book text, I cut out & matched up the two images (as shown below), I used Nougat Fresco Finish and Pearl Glaze for the wings
 for the reverse of the heart I covered it with book text which I colour washed..

... below is an ornament I've waited 11 months to make (I've had the baubles that long - since last xmas!) and this was the tricky customer when it came to photography...  Its a bauble that you can put images and 'stuff' inside and close up again! love!  Comes in two halves.. I die cut 2 scallop edged circles of white watercolour card (for the texture) and gave them separate treatments:
I stamped my Angel mini image (JM32) onto book text and mounted it onto the diecut circle,  I coloured her body with watercolour pencils and her wings with pearl glaze - and some stickle spots for a touch of sparkle.  I also added some 'fluff' (cobwebs at halloween, clouds at christmas!) with a few sequin stars scattered in to fill the available space..(hubby's suggestion).
Inside the other half I have stamped the scallop circle with distress ink and JM07 - snowflake background - love this stamp - its one of my favourites.. On top of that I glued a diecut word (sizzix 'word play') and stickled again - like I've said before: its christmas and christmas expects sparkle!

Bauble was so hard to photograph!  a reflective little devil! lol

I hope your christmas plans are coming along well... I'm popping to Southend tomorrow - rumour has that Father Christmas is visiting and he's bringing reindeer!!
(no seriously - Southend does have real reindeer .. not two-people-in-a-panto-suit reindeer!... can't vouch for the Father Christmas though...)

xx
Share:

13 November 2013

The first noel.......

..... I've used this christmas is on a box frame created for a workshop I'm running at The Stamp Attic on 24 November - there are still a couple of places left so please come and join in the festive fun - there will be stamping, painting, crackle glazing, die cutting and because it's christmas (and christmas expects it..) there will be glitter glue! (please use responsibly! lol)
Contact the shop to book your place...

xx
Share:
Blogger Template Created by pipdig