Mixed-media paper crafter; stamper, freelance craft tutor, designer of PaperArtsy JOFY stamps

2 January 2015

ALBOTAT: Scraps but not so scrappy...

... that they couldn't be used...

I love this pad of basic grey Aston Frost paper, it's a christmas pad but many of the papers can be used all year round and I especially like the green spot and the two striped papers... (do love a spotty paper!)


While I was tidying my desk the other day I found a strip of it the diagonal stripe paper which got me thinking.. you don't always need to always use it diagonally - so I cut some more strips to see/realise how it looks with alternative orientation....(its these little things that keep me distracted from the tidying up!)...


Another scrap on the desk was this red & white patterned piece which was very nice (more about why it was on the desk in the next few days) but the scrap I trimmed off was cute! - nice little scallop border: 

It was perfect for covering over a line of small text on this upcycled tag - it came on a christmas ornament - I like it when that happens: a nice ornament with equally nice tag! bazinga! lol


Sometimes 'scraps' are perfect for a project however small they might be...

xx

Share:

HAPPY NEW YEAR!!

Thanks for stopping by my blog, coming to classes, buying the JOFY products, or following me on social media - your support and company (real or virtual) is much appreciated.

I'm happy to wave goodbye to 2014 and welcome in 2015... I look forward to seeing you during the year to talk ink, paint, stamps and share creativity in whatever ways 2015 has in store!

xx
Share:

31 December 2014

I'm embracing romance .....

... in Craft Stamper's February issue... I designed the cover stamp and projects inside.......


The February issue isn't all about romance - its packed full of lovely colourful projects - grab yourself a copy now.

EDIT:  I've had a few questions about the embossing folder used on the card in the article - part of the  Cuttlebug set called 'Love is in the Air' (reference: SKU:2000221)

xx
Share:

30 December 2014

All that glitters is not always gold...

... but it is always an attractive addition to a card design - head on over to the PaperArtsy blog for my last post of the year...


xx
Share:

29 December 2014

I counted down to christmas.....

... and it was over in a flash! or thats how it seems - christmas always seems aaaaages away and then suddenly its tomorrow!.. if you know what I mean.. and now it was last week!

Here's a couple of christmas items that I created but couldn't include in the countdown as the items hadn't been sent / received...

Presents under the tree - I love wrapping presents - its a 'pink' job in our house (unlike outdoor lights which are definitely a 'blue' job!)


Wrappings were kept quite simple this year (seems I was a bit too zealous with the sellotape last year - too challenging for my young nephews! lol (probably not able to get in to the presents as fast as they'd like!))  Each present had a tag with the recipients initial made from chipboard and embossed with Frantage Embossing Enamel (Aged Silver), laid over the top of a band of JoFY JM07 snowflakes stamped in Snowflake Fresco Finish paint... and a bell - love these bells!!
I think this tag would be a great idea all year round - keep the large letter and just replace the snowflake with a band of patterned paper, or dry embossed pattern, or other stamped images..

* * * * *
Speaking of nephews I made them a card with a variation of my 'headless snowman' stamp (not as sinister as it sounds!)
I created a card with an acetate front panel and kraft back panel.  The kraft page was stamped with JOFY snowflakes (love that stamp!) and the 'Happy Christmas' sentiment from JOFY26 painted in Fresco Finish Snowflake paint.
The snowman was created using the Tim Holtz/ Sizzix 'Assembly Snowman' die... cute die but I thought I give it a twist and put his head on the floor.. like my stamp on my very first JOFY plate  - JOFY01

.. and while I was in the mood to assemble snowmen I made hubby a card using the same format - this time I created a Mr & Mrs snowman - and arranged them so they look as if they're coming together for a hug - or a dance - not so much slow-dancing as snow-dancing lol  get it snow.. snowmen.. oh nevermind!

On the die the snowman has one arm straight out and one bent in the middle - so I swapped them about so that Mr Snow has two straight arms & is holding his arms wide while Mrs Snow has 2 bent arms - her arms bent up to him (sort of side on instead of facing front)... cute, the sentiment is from JOFY28.  I also altered Mrs Snow's hat - cut it in half to make it look different.

ho ho ho ... too late for hohoho's now (or early for christmas 2015 - only 361 days to go until 25.12.2015! lol) ...

x x

Share:

24 December 2014

Countdown to Christmas: Day 24

Christmas is here!
(well, almost - 1 more sleep!)


This wreath is a new addition to the decorations this year - it's a (unlit) 18" BH Fraser wreath by Balsam Hill (www.balsamhill.co.uk).  
Fraser Fir Artificial Christmas Wreath
It is really lovely/easy to decorate:  its a nice full construction (bushy) (I was tempted to leave it bare as it is so nice). The realistic 'branches' spread out from a 5in metal 'frame', easy to position and sturdy enough to hang items onto with out dropping with their weight.  I created it to match this year's decorations by wiring the decorations onto the branches - this will make it easy to remove them and create a new design next year...(this wreath will definitely last more than one christmas) (if you head on over to the Balsam Hill website they are having a sale and you can stock up for next year)


I decorated the wreath using paper rosettes (Sizzix/Tim Holtz die) (I'm still working my way through the massive batch I created aaages ago), my stamp designs from JOFY08 (love these stamps - great for lots of cards, projects, occasions - not just christmas), wood stars, silver twigs and berries and a Martha Stewart snowflake punch - fun to create - I might alter it and create a 'happy 2015' or an 'easter' version....  but lets get christmas out of the way first. lol

(NB:  This wreath was sent to me to by Balsam Hill, the views are my own)


  I wish a Merry Christmas & Happy New Year to you & yours...


ho ho ho
Share:

21 December 2014

Countdown to Christmas: Day 21

Sometimes there isn't enough room on a tree for anymore baubles so I needed to find another way to display ornaments...


I love how baubles look when piled in a big bowl.
I cushioned the baubles against the glass by laying a garland of small pompoms (they look like tiny snowballs lol) in the bottom of the bowl.  The addition of a string of LED lights create sparkle around the bowl...

I can see me displaying other - maybe multi-coloured baubles - in the same way in years to come.

ho ho ho
Share:

15 December 2014

Countdown to Christmas: Day 15

I love seeing shop window decorations at christmas - these snowflakes cut from book text (love!) were in the window of a bookshop in South Kensington...


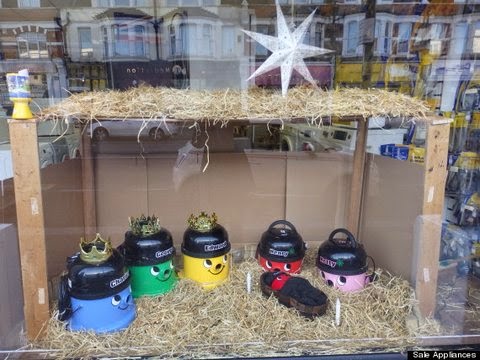
& this window display made me chuckle - the staff at Southend Appliances created a nativity scene with Henry vacuum cleaners..
(source: twitter)

ho ho ho
Share:

14 December 2014

Countdown to Christmas: Day 14

Our christmas tree has all kinds of baubles and decorations including four I made/decorated... I bought lovely clear baubles just crying out to be filled with 'stuff' (bought from Panduro).. festive stuff that can easily be removed and changed if next years christmas colour scheme is different...

This year I filled the baubles with natural tones to match the tree...

They are really simple to fill - just remove the hanging cap and drop things in!

A while ago I'd bought some cheap necklaces from a 'market' shop in my local town - the shop has now closed down, sad because it was a great place to buy jewelry with a view to taking it apart, 'upcycling' and using on other projects..

This bauble was a long strand of brown pearls - I left them connected so that they stayed as a clump in the bauble.

In this bauble I created layers of colour by adding strands of beads one at a time..

I added a strand of brown beads to this bauble and then some fine twigs (twisted willow) - I like the contrast between the natural twigs and the shine of the pearls... but then I had a 'what if...' moment and added some fine glitter... The glitter sits in the bottom, and sticks to the sides (static?) - and gives a lovely frosted effect..

Creating this last bauble has given me a new found respect for people who put ships in bottles! lol  I wanted to put a banner of text around the inside of the bauble - how to get it into the bauble?  how to keep it up upright?  how to stop it falling to bottom??

The answer to those questions is:
1. how to get it into the bauble?  Roll it around a pencil so it is a coil, hold onto one end with tweezers..
2 & 3:  how to keep it upright and how to stop it falling to the bottom:  I weighed down one end with a button & gems and attached the other end to the top of the bauble (under the hanging cap) - and the effect is a curl of paper showing the words 'happy christmas'.
The effect is like a filament in a lightbulb - love it.  I dropped in some additional pretty buttons for interest.

ho ho ho

x
Share:

13 December 2014

Countdown to Christmas: Day 13

The more observant of you may notice I've jumped from Countdown Day 7 to Day 15 and might wonder what happened on the days inbetween to delay the christmas countdown.....

Well 'christmas' things happened:...

*  a fabulous christmas lunch with fun friends... - here's the gift bag and tag I made to hold my Secret Santa gift

I think its been well documented on here that I am partial to a bit of corrugated cardboard and tags!.. and the combination makes for a great gift tag - along with die cut snowflakes - all very festive..

*   I went on a trip to London with friends to visit the Victoria and Albert Museum in London (THE MOST wonderful museum) to see the Wedding Dress Exhibition....

If you get the chance I would definitely recommend you go and see it - the dresses are so beautiful! The detail on them, the changing styles of dress and their place in fashion history..

I don't think the press photos did justice to the detail on model Kate Moss's wedding dress (by John Galliano) - the embroidery on this delicate dress is stunning.
And the Bride Wore...
(image Victoria & Albert Museum)

The Exhibition is a great display of dresses .. mostly in traditional pale colours except for the stunning purple dress worn by Dita von Teese
V&A Museum Bridal Exhibit
(image Victoria & Albert Museum)

One dress was a particular show-stopper - Flower Bomb by Ian Stuart.... 

On a personal note I was really pleased (and surprised) to see the dress worn by Lady Sarah Armstrong Jones (now Chatto) (Princess Margaret's daughter) for her wedding because when I was looking for a wedding dress this was on my 'mood board' (yes I had a mood board for the our wedding lol).  Designed by Jasper Conran, the delicate georgette and corset combination was beautiful.  A treat to see in reality....
My favourite royal bride of all time Lady Sarah Armstrong Jones and Daniel Chatto, July 14, 1994 wearing Jasper Conran

The Exhibition runs until 15 March 2015.

* Most of the week was spent on secret things...... watch this space... all very exciting...
Share:

7 December 2014

Countdown to Christmas: Day 7

I spent today at The Artistic Stamper in Faversham, Kent, where the Christmas Extravaganza weekend was in full swing.. The workshops were all about making a calendar for the coming year... I thought I share the page I designed for December - it has a very chritmassy wintery feel...


(please excuse the paperclips! lol)

Its created with JoFY stamps, Sizzix dies and Artistic Stamper stencils.

Share:

6 December 2014

Countdown to Christmas: Day 6

Today was quite a festive day - spent running a christmas card workshop at Blade Rubber Stamps in London... we made more cards than expected and was lovely to see familiar faces and meet some new people too.

The window at the shop has a very festive feel - lots of inspiration and goodies for christmas crafting...


Pop along to the shop or go online to see what is available.

xx
Share:

5 December 2014

Countdown to Christmas: Day 5

I decorate the fireplace in our sitting room at christmas - its on the opposite side of the room to the christmas tree so its nice to have something festive on each side of the room.

It's where I create a little winter street scene of miniature houses I've made (making one each year)..


The houses are intertwined with led lights (£2.50 for 40 in Primark!!! bargain!) and different types of ornamental trees - I like all the different sizes of houses...

This little house was made last year -crackleglazed with a corrugated roof, but unfortunately it was broken while in storage - but I think the broken antler give it character lol


This little house on a rickety stack of wood  was made last year - I love the patina tones and the little stocking hung on the edge waiting to be filled..

This years house is a bit different - not a decorated/upcycled wood house - this one made from paper and is quite simple but really effective when it is dark in amongst all those lights...:


Here's how I made it..

I glued pages of paper to kraft card, for strength, and dried it - smoothing out any air bubbles.  I drew a little sketch of how I wanted the house to look.

Stamped a panel of 'tiles' for the roof using the scallop border from JOFY13 (love that image!) - the top row is stamped scallop edge up - all other other rows are scallop down.

I cut the basic house shape out and left two straight panels either side - these will create the dimensional shape (stop the house falling over!).  I drew windows and doors on the reverse and started cutting them out.

On the outside of the house I doodled windows and doors and cut inside the designs

When the room is dark and the light source only comes from the string of LED lights it looks like this:


Easy and inexpensive way to create lit decorations.  Have a go yourselves - could be quite addictive I think!

x
Share:
Blogger Template Created by pipdig